
---
SKETCHUP: Create a Caravan 2 (Interior Design)
INTRODUCTION
This design is based on Papaw’s Cabin, http://www.tinyhappyhomes.com/site/models/gallery/papaw-s-cabin .

Floor.

Washing Corner.

Cooking Corner.

Rest Sofa.
Viewing Panel.
PREPARATION
Continue from Previous Tutorial or download a Startup File.
STEPS
1) Open the Startup File.
Save as papaw-cabin-2.

- Double-Click the Cabin Body to edit the group.

2) Set the Surface Material for the Cabin Wall to be transparent.
2.1) Using Select Tool, Double-Click the Front Wall to pick up the material.
1- Double-Click the Front Wall.
2- Click the Paint Bucket button. Click the Picker tool to select the Material used for the Front Wall.


3- Set the Opacity value to 10.
(Notice that the model is now visible through the semi-transparent cabin wall.)

4- Go around the cabin and paint the same material to the walls and the top of the cabin.
(Notice that the walls are semi-transparent from outside but opaque (not transparent) from inside.)

Info:
There are three ways to select objects depending on what you want to select:
Single-click, select the Face or the Edge.
Double-click, select the Face with its bounding edges.
Triple-click, select the entire object containing the Face.
|

3) Hide unrelated object.
1- Triple-click the Roof object to edit the group.

2- Right-Click the context menu and select Hide.

3- Outcome:

4) Create A New Layer For Interior Objects.
4.1) Select Menu Window/Layers.

4.2) In the Layers Dialog Window, Click + Button and type the name “Interior”.
Select the layer as shown below.

4.3) Draw the base for the Interior Objects.
1- For the sofa, draw a rectangle on the floor from the back-right corner of the cabin. It’s quite difficult to draw precisely. Just leave it like the example below.

2- When you type 3’,8’ in the Dimensions field, the rectangle resizes itself to the given values.

3- For the kitchen cabinet, draw a rectangle starting from the corner. Don’t worry if it goes outside of the cabin as long as it is sitting on the right axis. We’ll refine the it by typing the exact values in the next step.

4) To turn the direction of the rectangle, type -2’,4’.
(The Rectangle will move inside.)

5- Finally we have three rectangle objects for the Interior Design.

6- Deselect the checkbox for Layer0 to leave only Interior Layer on the screen

5) Create the Sofa and Kitchen Objects.
5.1) Raise the height of the objects as follows; 3’ for kitchen objects and 1’ for sofa object.

5.2) Draw the Stove.
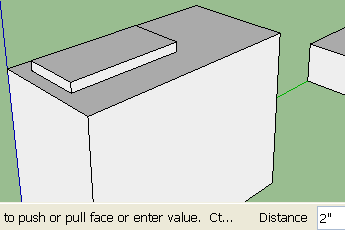
1- Draw the base (2’ x 1’).

2- Raise the base for 2”.
6) Using Guides for Drawing Detailed Objects.
Info:
The Measure Tool can be used to draw guide line or measure distance.
Press [CTRL] key to toggle between the two functions.
|

In order to draw detailed object such as the stove pot stand, we need guide lines as shown below:

1- Click the Measure Tool button.
2- Press [CTRL] Key to switch to Guide Line mode.

3- Draw the guide line; Click a point on the edge, drag somewhere away from the edge, type 6”

4- Repeat the steps to draw lines at 12” and 18” away from the edge.

5- Create a new guide line intersecting mid points of those three guide lines.
(Sketch can auto-detect the midpoint as shown below).

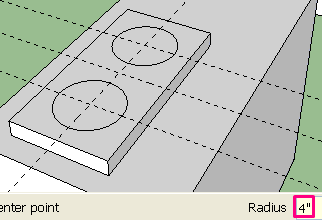
6- Draw two circles with radius 4” as shown below.
7- Use Eraser Tool to delete the Guide Lines by dragging the mouse crossing them as shown below.
(Make sure that only the lines turned blue. If other objects turned blue as well, they will also be deleted!)

8- Paint the Circles with DarkGray colour.

9- To draw the Kitchen Sink, draw three guide lines with 3” gap from the edge as shown below.

10- Draw a rectangle with 1’6” x 1’6” dimension.

11- Using Offset Tool, duplicate the Sink Edge 1.5” inside.

12- Using Pull/Push Tool, push the face down for 6”.

7) Duplicate and Rotate Objects
7.1) Using Move Tool, duplicate the sofa object.
1- Triple-click the object.
2- Press [CTRL] Key and Hold, move along Blue-Axis for 1’.

3- Release [CTRL] Key, move the new object along Red-Axis for 1’.

4- We are going to move the second sofa object downward. First, hover the mouse over the point shown in the example below, move down until you see Blue-Axis guideline, Press [SHIFT] Key to lock to this axis, click the point, drag the point down and type 1’.

5- Duplicate the second sofa object and move 2’ up along Blue-Axis.

6- Using the Rotate Tool, position the mouse over the point shown below until you see Green Colored Protractor.

7- Click the point and drag to the other end point. This creates the base line for the rotation.

8- Bring your mouse upward until you see the “On Blue Axis” label appears.

9- Start rotating a little bit and then type 120.

10- Move the third sofa object down.

11- The sofa needs to be moved inside a little bit so that it lies within the cabin. Move the object inside along the Red-Axis. Use Top View so that you can easily see its position.

8) Move the Model outside.
It may be difficult to select the model which is now trapped in the cabin. To overcome the problem, we can use Outliner Tool to select it.
1- Go to Menu Windows/Outliner.

2- Click the name of the Model, e.g Derrick.

3- Switch to Top View.
4- Using Move Tool, move it out along the Green Axis.

9) Finalizing the design.
9.1) Refine the Material for the objects.

9.2) It would be better if you could leave a little gap between the objects and the wall, roughly for 4”. Use the Move Tool adjust the position of each objects.

9.3) Save.
DOWNLOAD: Completed Project File
---
No comments:
Post a Comment